Chord and sight-reading course
Orientation
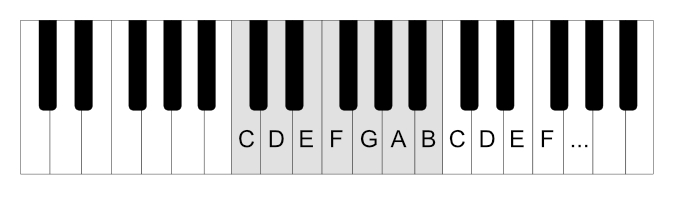
The sounds on the keyboard are arranged in a repeating pattern, in groups (of 12 keys). These groups are identified by the black keys – either two or three black keys together.
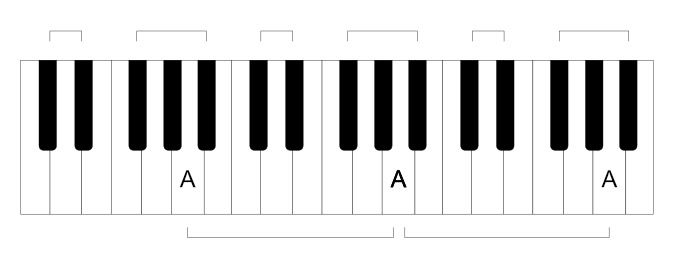
The white key located just before the end of a black group of three keys is labeled as the note A.
The further to the right you go, the higher the notes (thin, squeaky); the further to the left, the lower the notes (thick, bassy).
Learn to find different A keys on the keyboard
The keyboard layout is distinctive enough that you can find the keys with your eyes closed.
Try it: without looking, "by touch," find the A keys with your right hand (preferably your ring finger).
Spend some time on this until you can do it 100% flawlessly and quickly.
White keys: the musical alphabet
The consecutive white keys are named after the letters of the alphabet:
A, B, C, D, E, F, G
and then it repeats – from A to G, up to the next A.
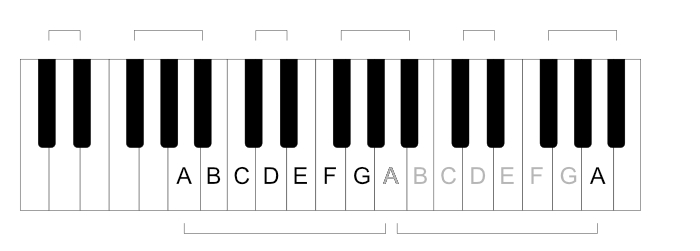
...and then it repeats – from A to G, up to the next A.
Black keys
With a sharp: raised notes
Black keys represent "half steps."
For example, "A and a half," "C and a half," etc.
They take the name of the preceding white key, with the addition of a sharp sign – ♯. So, you'll see A# (A sharp), C# (C sharp), D sharp, etc.
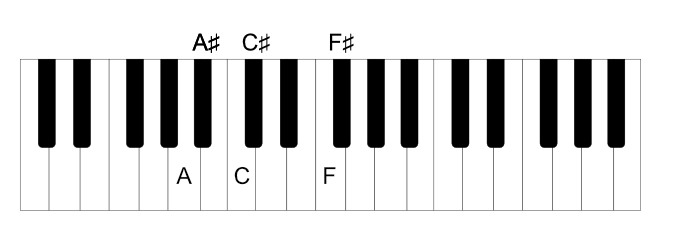
Literally, "sharp A," "sharp C," etc.
With a flat: lowered notes
Just as on a clock we can say it's 2:30 or "half past 2", black keys can also be named in two ways, depending on which "target" white key we refer to.
Instead of "C and a half," we can say "half to D."
So, the names of black half-steps can also be formed from their "right neighbor" (the white key to the right) by adding a flat sign: ♭ (e.g., "flat C," "flat D," etc.).
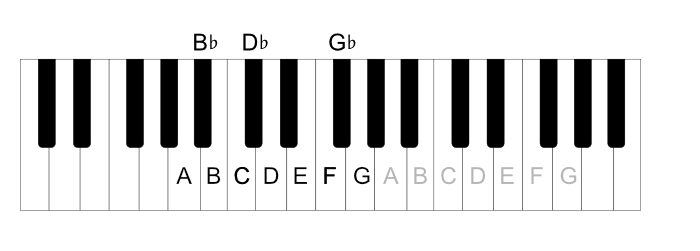
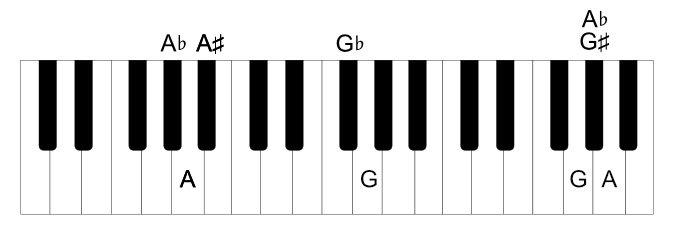
Thus, each black key has two names:
C♯ – D♭
D♯ – E♭
F♯ – G♭
G♯ – A♭
A♯ – B♭
To summarize: black keys are named relative to a white key, depending on the context: e.g., raised A (A sharp) or lowered B (B flat).
German notation
In the German tradition (also used in some other countries), instead of using "sharp" and "flat," black keys are named by adding the suffix "-is" (for raised) or "-es" (for lowered): e.g.
Raised (with a sharp):
A♯ – Ais (raised A)
C♯ – Cis (raised C)
D♯ – Dis (raised D)
etc.
Names with a flat are read by adding the suffix -es, so:
A♭ – As (lowered A)
E♭ – Es (lowered E)
D♭ – Des (lowered D)
G♭ – Ges (lowered G)
etc.
An additional complication in German notation is that the key B is named "H" (so we have A H C D E F G).
Furthermore, the black key A♯ (B♭) is renamed B. So, with the black keys, we have sequentially:
A B H C D♭ D E♭ E F G♭ G A♭
(and repeating)
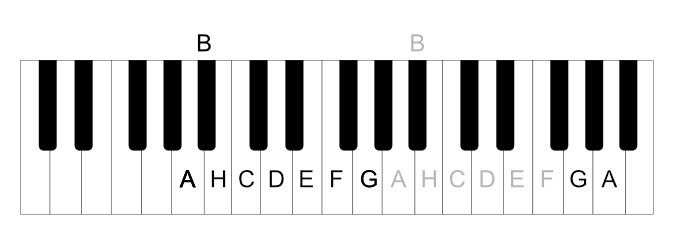
or counting from C
C D♭ D E♭ E F G♭ G A♭ A B H
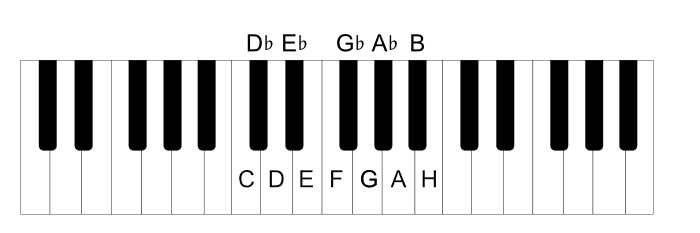
But for now, for the purposes of this course, we will stick to the English names, which are more widely used and easier to grasp.
Start by learning key names
White keys
Exercises played with the right hand.
You can toggle hints with keyboard shortcuts:
- "hints always visible" (key H)
- keyboard hints (key K)
Now the correct hand position: Your thumb should be on the C key, the other fingers bent (imagine holding a small ball in your hand) and naturally resting on consecutive keys. This means your pinky automatically lands on the G key.
Great!
Time for your first song:
"Kitty Climbed on a Fence" (Simple Tune)
Play the correct notes without changing your hand position, thumb "glued" to the C key.
Black keys: sharps
Keys C D E F G and Black Keys C# D# F# G#
Now, let's practice the names of subsequent keys:
Keys C D E F G A B plus Black Keys
For these "further" keys, reach with your pinky or ring finger.
Easy?
Try the same exercise with a metronome. You can turn on the metronome with the M key.
Try different tempos until you can play quickly with 100% accuracy.
Metronome game
When playing with a metronome, you can add more adrenaline by enabling "metronome game" in the application options, where you have to jump over obstacles.
When this option is enabled, the game starts when the metronome is turned on – key M.
You may also enable the jumper game via the J keyboard shortcut.
Use this mode for every exercise in this course. Playing in time makes each one much harder.
Black keys: flats
Now it's time for the "half to" keys, meaning "flat" (with a flat sign):
Black Flat Keys D♭ E♭ G♭ A♭ B♭
Keys C D E F G and Black Flat Keys D♭ E♭ G♭ A♭ B♭
White and Black Keys: Alternating ♯ ♭
By touch
You already know the names of the keys.
Check if you can find the correct keys "by feel," without looking, with your eyes closed, in different places on the keyboard.
=> Remember the default hand position – thumb on C, fingers bent, like holding a ball.
Play white notes "deeper," between the black keys, using the black keys as reference points.
Notice how surprisingly easy it is to hit the correct key with your eyes closed. After a bit of practice, finding notes without looking becomes natural.
It's important to spend some time thinking about what you feel, what tactile sensations you experience when playing a given note.
Consider what you feel when you press the D key.
When playing D (thumb on C), you'll feel that your index finger always lands "in the gap" between the black keys C# and D#.
This way, by shifting your position between individual D keys (index finger), you always have the C key (thumb) and G key (pinky) within reach.
Spend some time being able to name the keys you're touching as you move your hand to different parts of the keyboard.
The staff
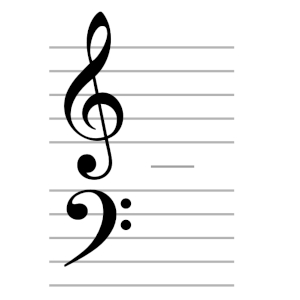
Piano sheet music consists of two staves – one for the right hand (upper part) and one for the left hand (lower part).
The note located in the middle of the piano is Middle C. It sits exactly between the two staves, on a small ledger line.
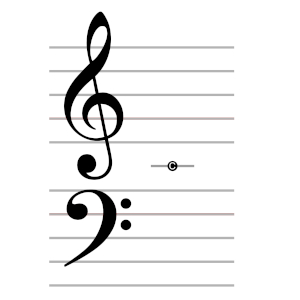
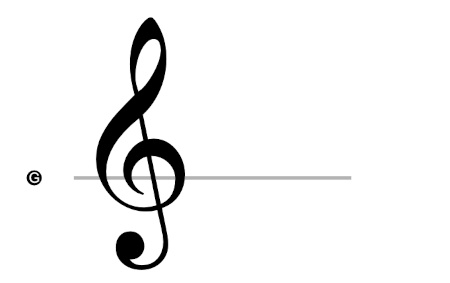
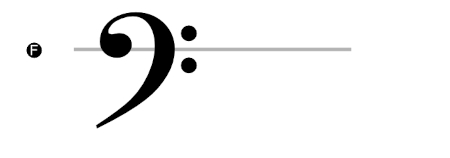
The staves are marked with two fancy symbols – clefs, whose shape indicates where the most important notes are located:
Right hand (Treble Clef / G Clef) – The note G in the right hand, played with the pinky.
See how the "target" shows that it refers to the note G:
Left hand (Bass Clef / F Clef) – The note F in the left hand, played with the pinky.
See how the dots indicate that it refers to the note F:
Middle C and the notes F (in the left hand) and G (in the right) are our main reference points.
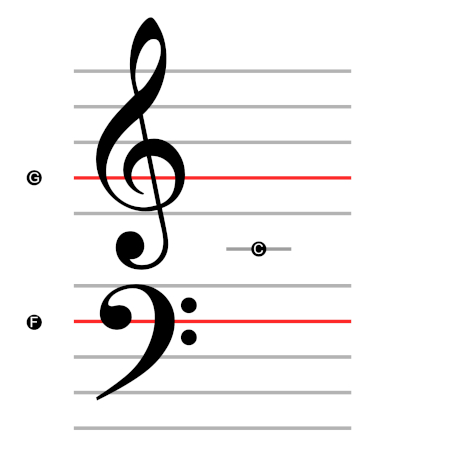
The note C also divides the keyboard into easily visible areas on which we will focus.
It's getting quite complicated, so we'll simplify things!
Flipping the staff
Let's look again at the names of the keys (the musical alphabet).
We divide the keyboard in half at Middle C (left and right hand).
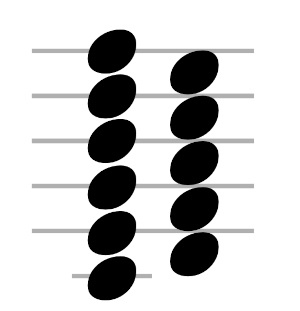
For easier orientation, let's add a grid of lines. Middle C is marked with a shorter line.
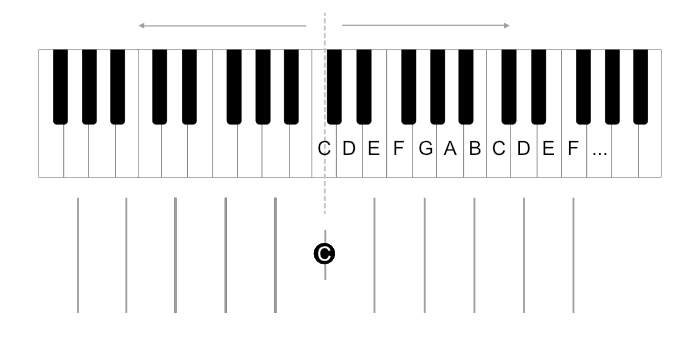
Starting to look familiar?
Exactly, these are our staves for both hands, just flipped!
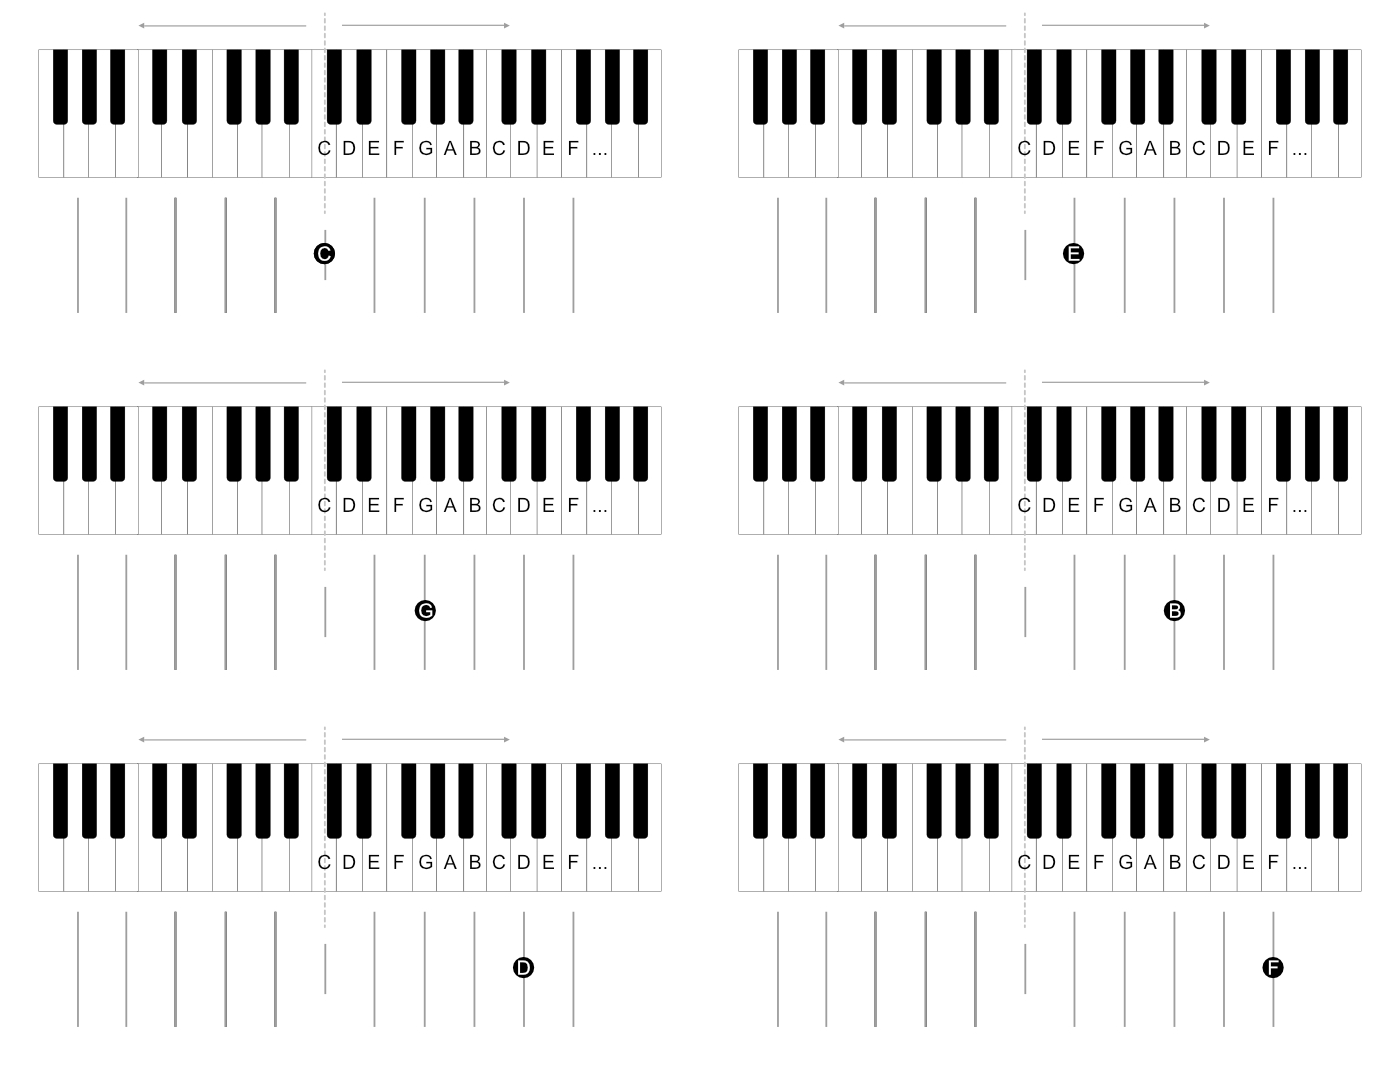
For now, for the purposes of this course, we will work with this flipped, vertical staff.
On it, you can clearly see how the notes on the staff correspond to the keyboard layout:
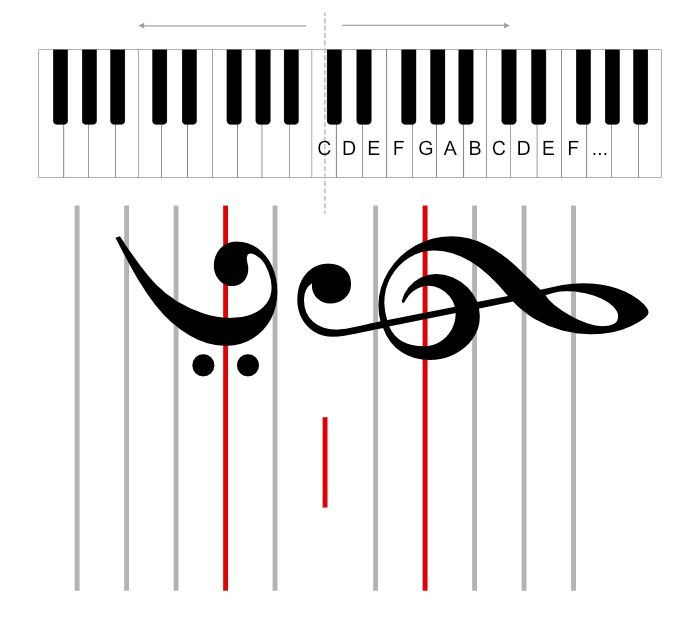
Notice that some notes are on lines, while others are between lines (two different types of positions on the staff: on a line, or "in a space" between lines).
First notes
White keys
Time for your first exercises with notes on the staff. Right hand only:
Remember the default right hand position: thumb on C, pinky on G.
Remember also that we are focusing on the area from C to C (so B is played as the high one, on the right side, even though there's also one on the left, near C).
Important: In the application options, you can select specific notes you want to practice. If you find some notes challenging, practice those especially. Then you can add them one by one.
Black keys: sharps
As you know, a sharp sign (♯) next to a note means you play the black key next to it (the "higher" one, to the right).
Notes C D E F G and Black Keys C# D# F# G#
Remember the default hand position with your thumb on C. For some notes (e.g., A#), you'll need to reach far with your pinky.
Black keys: flats
A flat sign (♭) next to a note means you play the black key before it (the "lower" one, to the left).
Two notes at once: thirds
In this part of the course, we will play two notes simultaneously.
We always play them with the same fingers – thumb and middle finger.
The other fingers naturally rest on adjacent keys.
IMPORTANT: We only read the first note (where to place the thumb). The second note automatically comes from the hand's position, from the fact that we are supposed to play it with the middle finger.
You just need to remember that some have a sharp (you need to play the black key).
Notice that the distances between such two "glued" notes are always the same. The position (thumb and middle finger) is always the same. As if frozen. We move the entire "frozen" hand to a new location.
The first note tells you where to place your thumb; the rest of your fingers fall into place automatically.
The distance between the keys played by the thumb and middle finger is called a third.
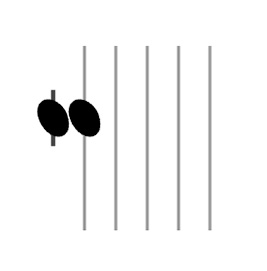
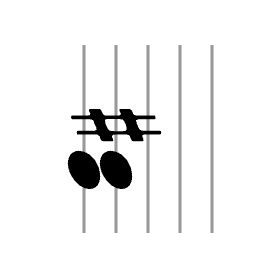
A C third and an E third
Thirds can also be viewed as a distance of 5 keys, or a distance of "three keys in between."
Note that in a third, both notes are always on the same type of staff position (either both on lines, or both between lines).
Thirds of white keys
From the fact that thirds are a distance of 5 keys (or a distance of "three keys in between"), it follows that sometimes you need to play a black key:
Thirds of black keys
Thirds of white and black keys
Thirds of black keys: lowered, with a flat
Coming soon.
Test: thirds
Can you already play thirds of all notes? 100% accurate, rhythmically, and quickly?
Fifths
We move on to similar exercises as with thirds, but instead of the middle finger, we will use the pinky.
Fifths are one of the most comfortable intervals to play. When you place your hand on the keyboard, your pinky and thumb naturally land a fifth apart.
They look roughly like this (with a gap).
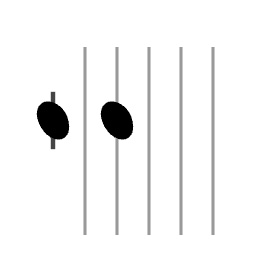
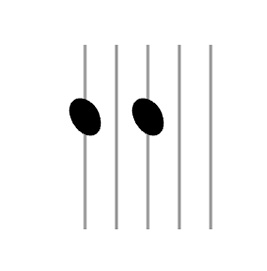
A C fifth and an E fifth
Notice that both notes of a fifth are on the same type of staff position (either both on lines or both between lines) and there is a gap of one position between them.
As before, the hand shape is "frozen."
We play the notes with the thumb and pinky. The distance is eight notes, or "six notes in between."
We only read the first note. The next one is played automatically by the pinky, wherever the pinky naturally lands.
Fifths of white keys
Fifths of black keys (with a sharp)
Fifths of white and black keys
Fifths of black keys: lowered, with a flat
Coming soon.
Thirds and fifths together
After mastering fifths, return briefly to the previous exercises with thirds. Check if you remember them well.
Then you can move on to practicing thirds and fifths together.
Thirds and fifths of white keys
Thirds and fifths of black keys
Straightening the staff
You can identify distances, so we can now start bringing the notes back to vertical. Remember we rotated the staff to make it easier for ourselves?
Now a few exercises with thirds and fifths, but with the staff becoming increasingly vertical.
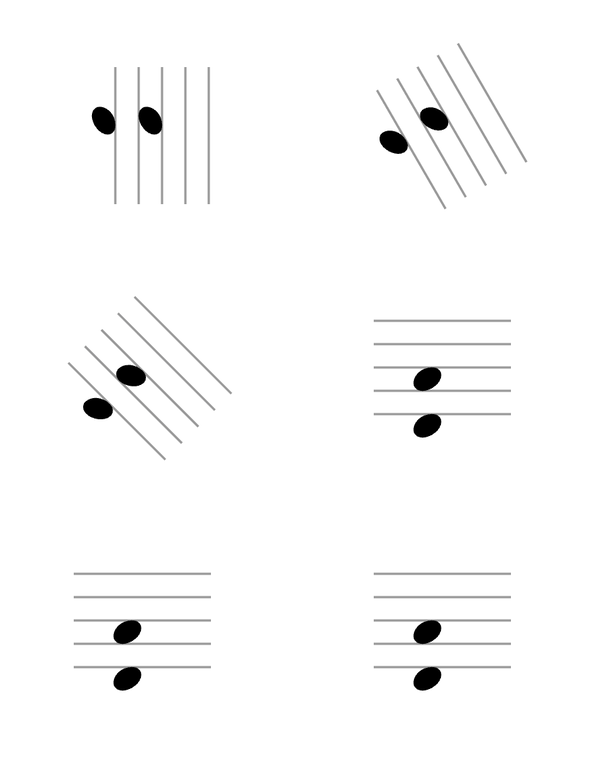
Thirds – naturally, horizontal
Fifths – naturally, horizontal
First chords: triads
A chord is several notes played simultaneously.
A triad is three notes played simultaneously.
If we combine our thirds and fifths into one chord, each time we will see a "snowman" in the notes (three notes stacked together).
We call these major chords (they sound happy).
Major chords consist of a root (the base note, played with the thumb), a third (played with the middle finger), and a fifth (played with the pinky).
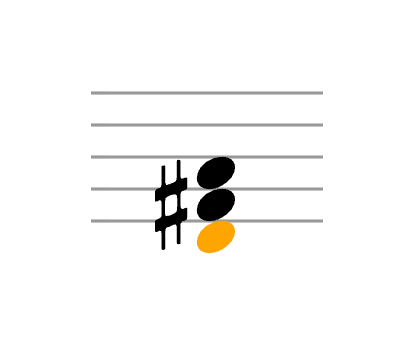
And just like before, the hand shape is frozen.
We only read the first (lowest) note and place our thumb there. The other notes are played "automatically," wherever our fingers land.
Chords with sharps
Chords with flats
What's next?
Since you can now read major chords, you can start practicing minor chords (which sound sad).
They are built almost the same way as major chords, but the third is lowered by one key. Such a lowered third is called a minor third.
So, for example, instead of C-E-G (C major), we have C-Eb-G (C minor).
With musical notation:
Note that chords are always built from two thirds:
- Major (happy) – major third + minor third
- Minor (sad) – minor third + major third
You can also practice minor thirds. We usually play them with the thumb and middle finger, just like major thirds.
Two thirds together (a minor and a major) form a fifth.
Inversions (chord voicings)
First inversion
Using the C chord as an example, we will learn what inversions are.
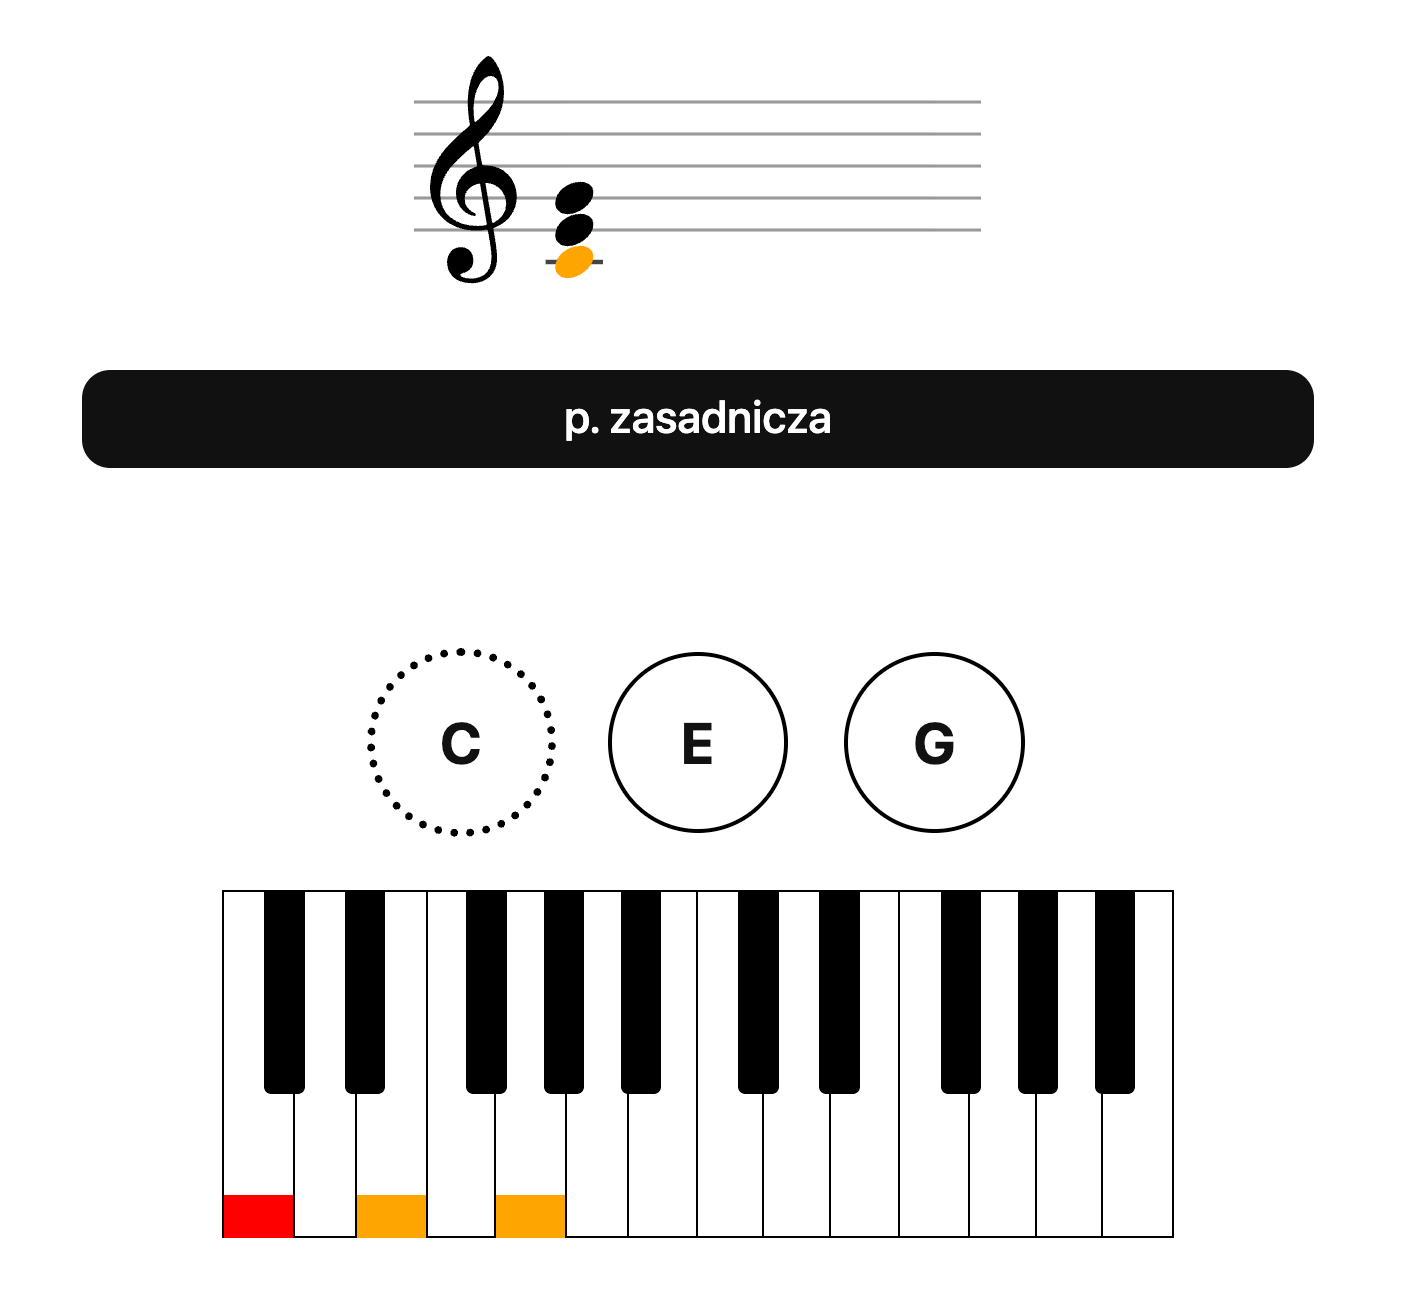
As you know, the note C can be played in several places on the keyboard.
Instead of playing it low, we can "move" it up:
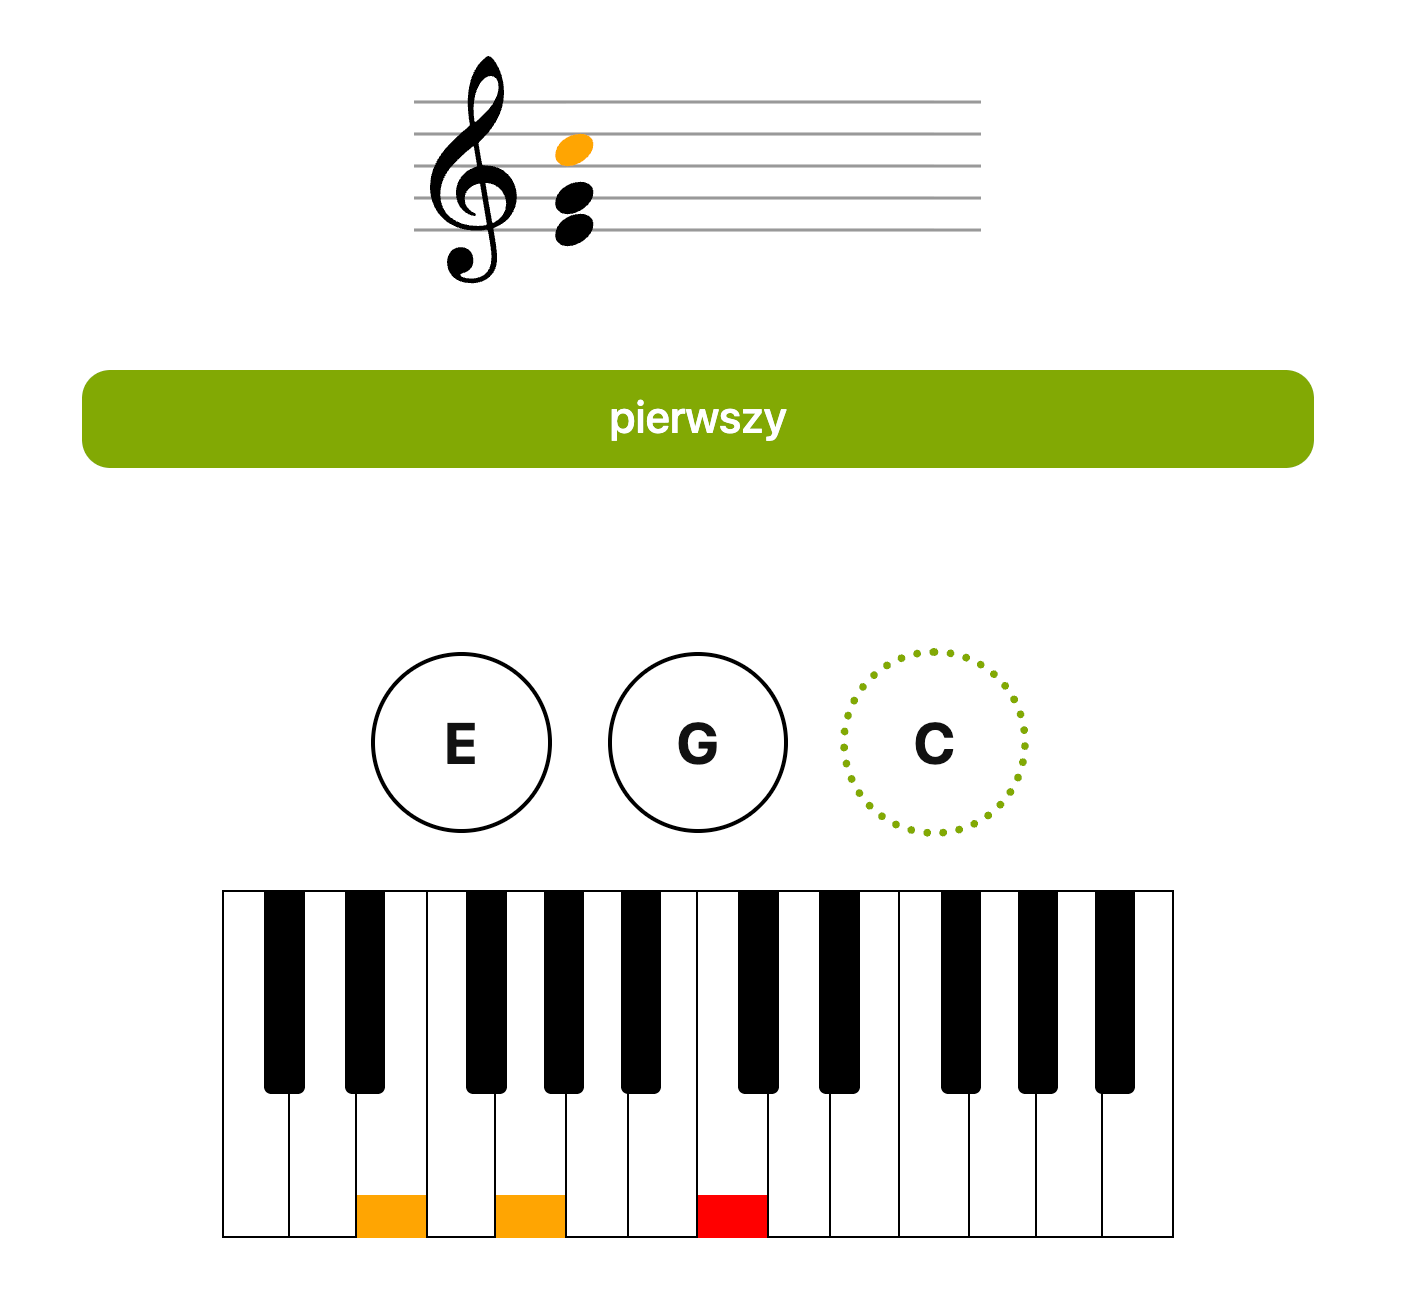
Then the finger placement will change, and the root note, instead of being played with the thumb, will be most comfortably played with the pinky, and the first two notes with the thumb and middle finger.
Now try to create and play inversions of the F and G chords.
Notice that when playing chords in their root position, we always played them with a specific "hand shape" (thumb, middle, pinky finger), which we had "frozen" and moved left or right, relative to the thumb.
Inverted chords also have such a characteristic shape (thumb, index, pinky finger) and we move it "frozen" left or right relative to the pinky finger (meaning we "read the root note with the pinky finger").
With notes:
Inversions C, F, G (without hints)
To remember: root position – the root note at the bottom of the chord (with the thumb), first inversion – the root note at the top of the chord (with the pinky).
First inversion – third at the bottom.
Second inversion: with the middle finger
In the first inversion the root note is moved (inverted) to the top of the chord.
We can also move the third to the top of the chord:
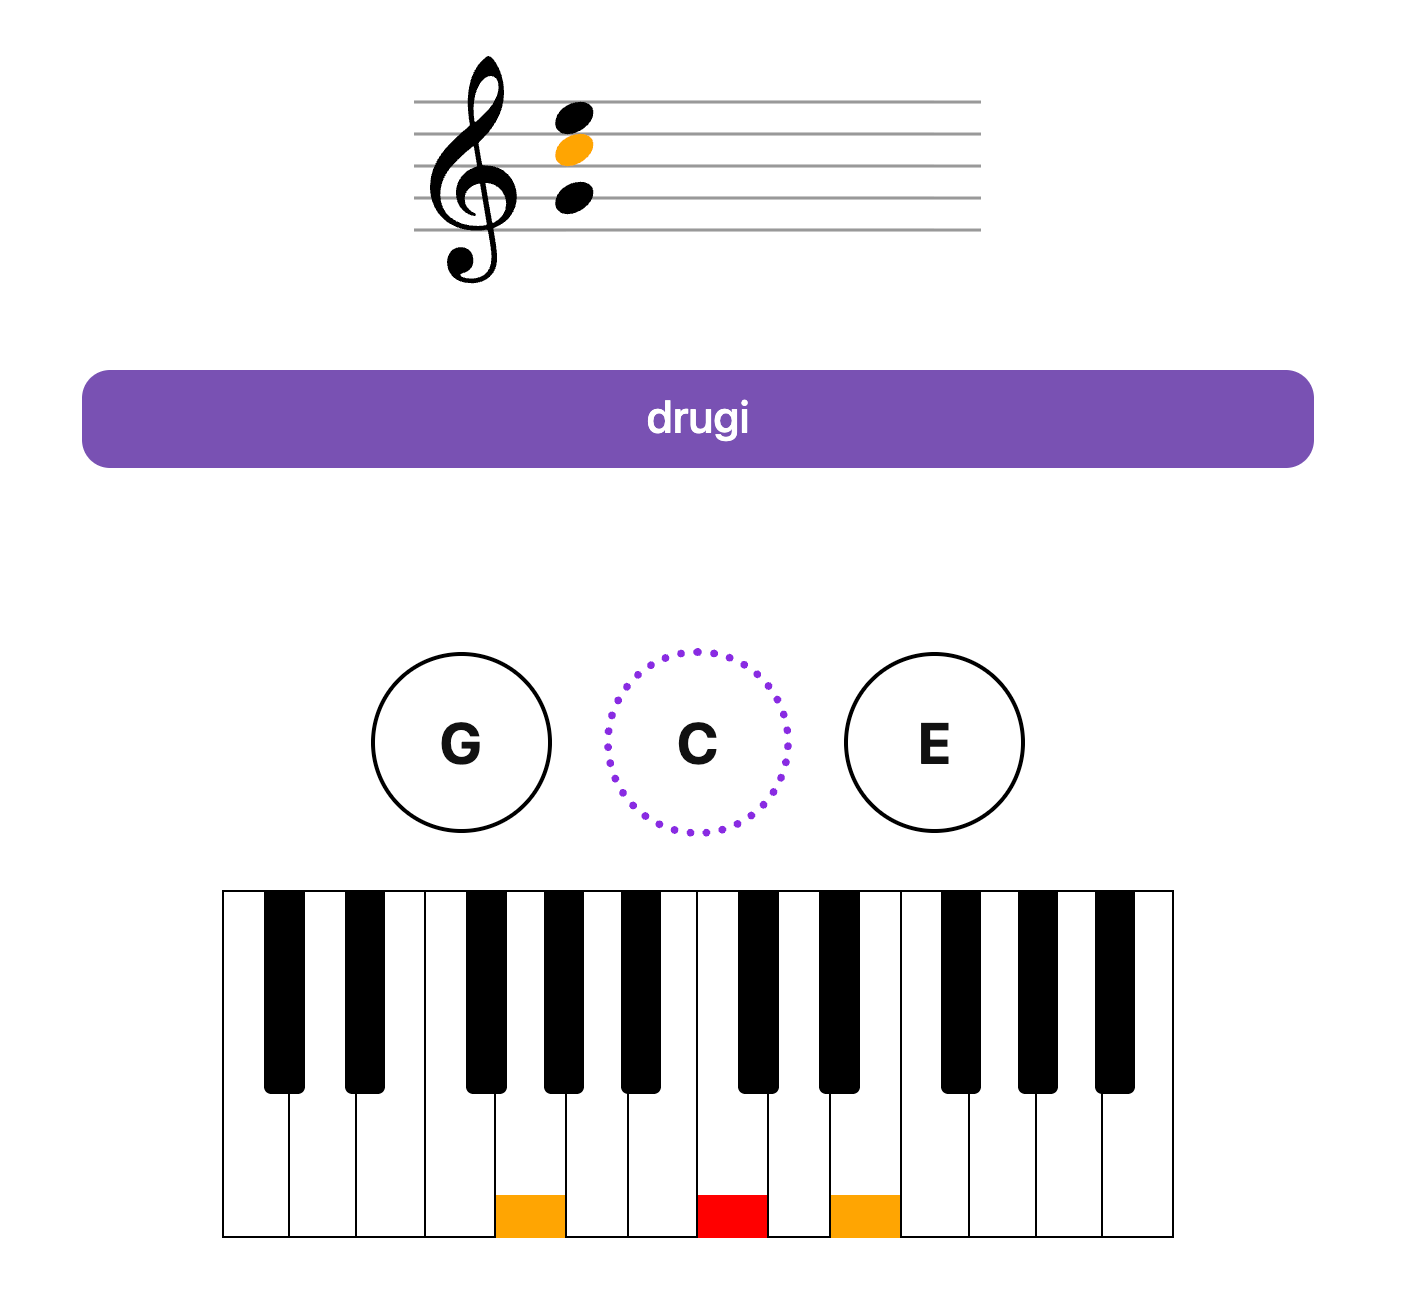
Then we will get a new shape (second inversion), which we will move relative to the middle finger (thumb, middle, pinky).
With notes:
Second Inversions C, F, G (without hints)
Let's try playing all inversions of one chord in sequence:
With notes:
Note: in PianoKitty you can easily choose which inversion you want to practice using keys 0, 1 , 2
To remember: you now know three "shapes" of chords:
- Root position (with the thumb)
- First inversion – with the pinky, third at the bottom
- Second inversion – with the middle finger, fifth at the bottom
Chord notation in inversions
Note that in PianoKitty, inversions have their own color markings:
- Root position – black
- First inversion – green (root note with pinky finger)
- Second inversion – purple (root note with middle finger)
Exclusively for the purpose of the application, for educational purposes, we also use a dot in the inversion name notation, e.g.:
- C.1 – first inversion of the C chord
- C.2 – second inversion
- C – root position
In musical contexts, chord inversions are usually written with a slash, adding the name of the bass note after the slash, e.g.:
- C/E – C with E in the bass, or C with the third in the bass – first inversion
- C/G – C with G in the bass, or C with the fifth in the bass – second inversion
- C – root position
You can choose the method of naming inversions (with a dot or with a slash) in the application options.
Note that in the application options, you can also enable two helpful functions:
- root note in different color – (the most important chord note highlighted on the staff)
- highlight bass key – highlighting the most important note in the keyboard hint
Second inversions of subsequent chords
Second Inversions C, D, E, F, G, A, B
Second Inversions C#, D#, F#, G#, A#
Second Inversions – White and Black Keys
With notes:
Second Inversions C, D, E, F, G, A, B
Second Inversions C#, D#, F#, G#, A#
Second Inversions – White and Black Keys
Individual inversions:
All Inversions of Major Chords (random)
Pro tip: practice with a metronome, key M, aim for 100% accuracy.
Other intervals
Intervals are the distances between individual notes (keys).
We already know the following intervals: fifth, third (major), and minor third.
But there are more:
| Interval | Symbol | Semitones | Keys to skip | Example from C |
|---|---|---|---|---|
| Perfect unison – zero, the same key | P1 | 0 | 0 | C → C |
| Minor second | m2 | 1 | 0 | C → C♯ / D♭ |
| Major second | M2 | 2 | 1 | C → D |
| Minor third | m3 | 3 | 2 | C → E♭ |
| Major third | M3 | 4 | 3 | C → E |
| Perfect fourth | P4 | 5 | 4 | C → F |
| Tritone / Augmented fourth / Diminished fifth | TT / A4 / d5 | 6 | 5 | C → F♯ / G♭ |
| Perfect fifth | P5 | 7 | 6 | C → G |
| Minor sixth | m6 | 8 | 7 | C → A♭ |
| Major sixth | M6 | 9 | 8 | C → A |
| Minor seventh | m7 | 10 | 9 | C → B♭ |
| Major seventh | M7 | 11 | 10 | C → B |
| Perfect octave | P8 | 12 | 11 | C → C (next) |
"Keys to skip" = how many keys (white + black) you pass before reaching the next note of the interval.
How to quickly recognize an interval by looking at the note arrangement on the staff:
- Seconds → almost touching / adjacent line–space
- Thirds → (half a snowman, legs and belly) glued side-by-side (note heads almost touching)
- Fourths → one line / one space in between
- Fifths → (easiest to recognize) (snowman's legs and head) two lines / two spaces in between
- Sixths → three lines / three spaces in between
- Sevenths → four lines / four spaces in between
- Octaves → far apart, identical type (line ↔ line, space ↔ space) – five lines / five spaces in between – look "like twins" vertically
Interval exercises:
Properties: usually on the same type of staff position (both on lines or both in spaces)
Properties: close together, if one is on a line – the other is in a space (and vice versa)
Properties: both notes on the same type (both on lines or both in spaces), note heads almost touching side-by-side
Properties: thirds – glued side-by-side, on the same type of staff position (both lines / both spaces)
Properties: one note on a line, the other in a space (or vice versa) + one line / one space between note heads
Properties: exactly the same arrangement as a perfect fifth, but with a sharp / flat that "compresses" the interval by a semitone
Properties: two lines / two spaces between note heads (looks like a "large gap" between notes)
Properties: three lines / three spaces between + one note on a line, the other in a space (or vice versa)
Properties: both notes on the same type (both lines or both spaces) + three lines / three spaces between
Properties: four lines / four spaces between + one on a line, the other in a space (typical "large jump with line/space swap")
Properties: both notes on the same type (line–line or space–space) + four lines / four spaces between
Properties: both notes exactly on the same type (both on lines or both in spaces) + five lines / five spaces between – they look "like twins" vertically
Other chord types
There are many types of chords. Each has its unique sound – more cheerful, sad, aggressive, delicate.
They consist of different numbers of notes and different intervals.
The best way to learn individual chord types, in various inversions, is with our course:
Try to complete all levels in order, with at least 95% accuracy.
Notes:
- You can use the I key to enable extended chord information.
- Key N to toggle notes on/off
- In the application options, you can select the types of chords you want to practice simultaneously.
Examples of chord exercises:
All C chords:
Chords C – triads: major, minor, dim
Chords D – triads: major, minor, dim
Chords C – triads: major, minor, dim – 1st inversion
Chords C – triads: major, minor, dim – 2nd inversion
Chords C – seventh chords: maj7, 7, min7, min7b5
The next step is practicing chord types in inversions.
In PianoKitty options, you can select which inversions you want to practice.
You can also change the current inversion for practice by pressing keys 0, 1, 2 etc. (chords with more notes have more possible inversions)
Pro tip: key N toggles notes on/off.
Arpeggiated chords (melodic chords)
So far, we've learned to read chords played harmonically, meaning all notes at once.
We can also play them melodically, meaning each note consecutively.
Note: In PianoKitty, you play them by adding subsequent notes (without releasing the previous one).
Ascending
Major chords ascending – first inversion
Major chords ascending – second inversion
Descending
Major chords descending – first inversion
Major chords descending – second inversion
Mixed
Major chords mixed notes – first inversion
Major chords mixed notes – second inversion
Higher octaves
Major chords one octave higher
Left hand: a big chapter
As mentioned earlier, notes for the left hand are described by the staff marked with an F clef (Bass Clef):
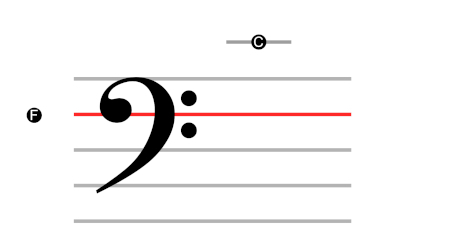
The reading rules are the same: we read intervals (distances between notes – thirds, fifths, whether on a line or in a space, etc.), but the position of individual notes is slightly different than for the right hand.
The main reference points are: C notes (middle C, common to both staves) and F (marked by the clef).
Hand position: pinky on F, thumb on common C.
Now all the exercises we did for the right hand can be repeated for the left hand, and later for both hands simultaneously.
So start from the beginning, from Exercise #1, doing it with your left hand.
And then another round – with both hands.
Using keyboard shortcuts and application options, adjust the settings for your specific goal.
In PianoKitty, you can easily switch hands with the ctrl key (left, right, both, irrelevant).
You can toggle musical notation on/off with the N key.
The clef for the left/right hand can be selected in the application options.
Songs
Once you've mastered chords, you can start playing songs.
How to do it?
Think of a song you want to learn. Find the chords for that song online, by typing e.g., "adele hello chords".
In the application options, under the Specific Chords tab, you can enter the names of the chords you want to practice.
Other options for learning songs
- Check out our Songs page with example tunes
- See the Axis of Awesome progression – a few simple chords = play hundreds of songs
- In the application options, you can practice chord progressions: Key > Selected scale degrees
- Play songs with Chordify
What this course leaves out
Musical notation is complex. This course simplifies or skips many of its nuances.
This part of the course focuses only on reading pitch. Reading rhythmic values is a separate matter.
We do not introduce the concepts of scales, or key signatures.
But you can, of course, practice them with PianoKitty by adjusting the application settings.
Notes for parents
The course is designed for individuals who have at least a minimal familiarity with English and computers.
However, with parental support, even 4-5 year old children can complete the exercises.
Ideal scenario: a parent/guardian learns themselves and, in the process, also teaches their child, assisting them during their exercises and helping when they encounter problems.
The options let you simplify the exercises a lot and make them more attractive for younger children who struggle with concentration and motivation.
The main task of the parent is to motivate for daily practice. Even short sessions, but daily.
Here are a few strategies parents can use to help their children:
- Enable "hints always visible" (key H)
- Enable keyboard hints (key K)
- Toggle "pictures as rewards" ("funny" kittens in options) – sometimes they help, sometimes they are an unnecessary distraction; consider when they are beneficial
- Read aloud the texts displayed on the reward pictures to the child (what did the cat say?)
- Say who the next cat will be (e.g., the next cat will be Grandpa John)
- Return to previous, easier exercises – until they are performed flawlessly
- Return to previous exercises – until they are performed quickly, even expressively
- Minimize the number of notes practiced simultaneously (e.g., in the application options, select only C and E – master these two perfectly, then add D and so on)
- If you see that some notes are causing problems – practice only those, repeatedly; turn others off
- Turn on the metronome (key M) at a comfortable tempo for the child
- The youngest children can practice notes (or key names) in "toddler mode" (which can be enabled in the options). In this mode, everything is simplified, and rewards are displayed frequently
- Use the "metronome game" mode (jumping over hurdles) – for this mode to work, the metronome must also be on – M. Counting aloud (one, one, one, one) and choosing the right tempo are key here (see options "do not increase difficulty" and "do not decrease difficulty"). It's also worth simplifying the game by choosing only a few specific notes/chord types (see point 8).
- Create riddles (e.g., recognizing sounds – "ear training" options)
- Play daily, even for two minutes, to build a habit
- In the bottom left corner of the application (number in a green circle) – you'll see how many consecutive days you've practiced – try not to miss a day. Clicking this icon displays detailed statistics, in minutes.
- On the statistics page, there's a link to the "Your Rewards" page, where "coins" for daily playing can be exchanged for rewards (animal pictures). Rewards can be "bought" and "sold" (to exchange for others)
- Involve friends in the fun – common topics, competition; you can play with several people simultaneously
- Children can play on the same piano together (or with you) – enable the "each chord 2x" option – then you play the same thing in turns
- Come back to this list for ideas if you notice that motivation or enjoyment has decreased
Some of these strategies may not make sense to you yet, but they will certainly be useful later in the course, so it's worth revisiting them from time to time.
License
The content of this course is available for free. It may be freely reproduced, provided that the source and author are cited, and that it remains free of charge.